Posted on 2 Comments

Stoltec Moto in the News: Electric KoolAid for the Road!

Recently, Lloyd Horton and I crossed paths.  Lloyd, an avid motorcyclist and owner of a Triumph Tiger 1050, puts out a pretty cool weekly web broadcast:  Electric KoolAid for the Road.  Not only did the Yamaha FZ-09 pique Lloyd’s curiousity, but he was interested in hearing more about what Stoltec Moto is, how we operate, and what some of our plans are.  Take some time and listen to Electric KoolAid for the Road.

The segment in question can be found here:  Stoltec Moto. Historic Moto Gran Prix. Yamaha FZ09

Posted on Leave a comment

GP Suspension 25 mm Cartridge Teaser

No pictures to show yet, but production was kicked off on the rear brake reservoir relocation kit. From the laser, to the bender, to the powder coater, and back here. Hoping to have these kits in stock and ready for shipping in about 6 weeks – just in time for spring (can’t wait for winter to die).

The headlight is off to Chad @ Affordable HID Retrofitting. I’m going with simple/clean, no nonsense 35W 4300K retrofit to match what I did on the Tiger 1050. No halos or fancy LED strips…can’t wait to see how it looks. While the stock low-beam was ‘ok’, the high beam was aimed too high. Aiming it lower put the low beam entirely too low for back road riding. Such is life with a dual filament hi/lo setup, so I’m confident this is the right approach.

While the FZ is blind, a host of other projects are taking shape. More information in due time, but here are some pictures to whet your appetites:

More information to follow soon.

Posted on Leave a comment

FZ-09 Fork Service NOW AVAILABLE!

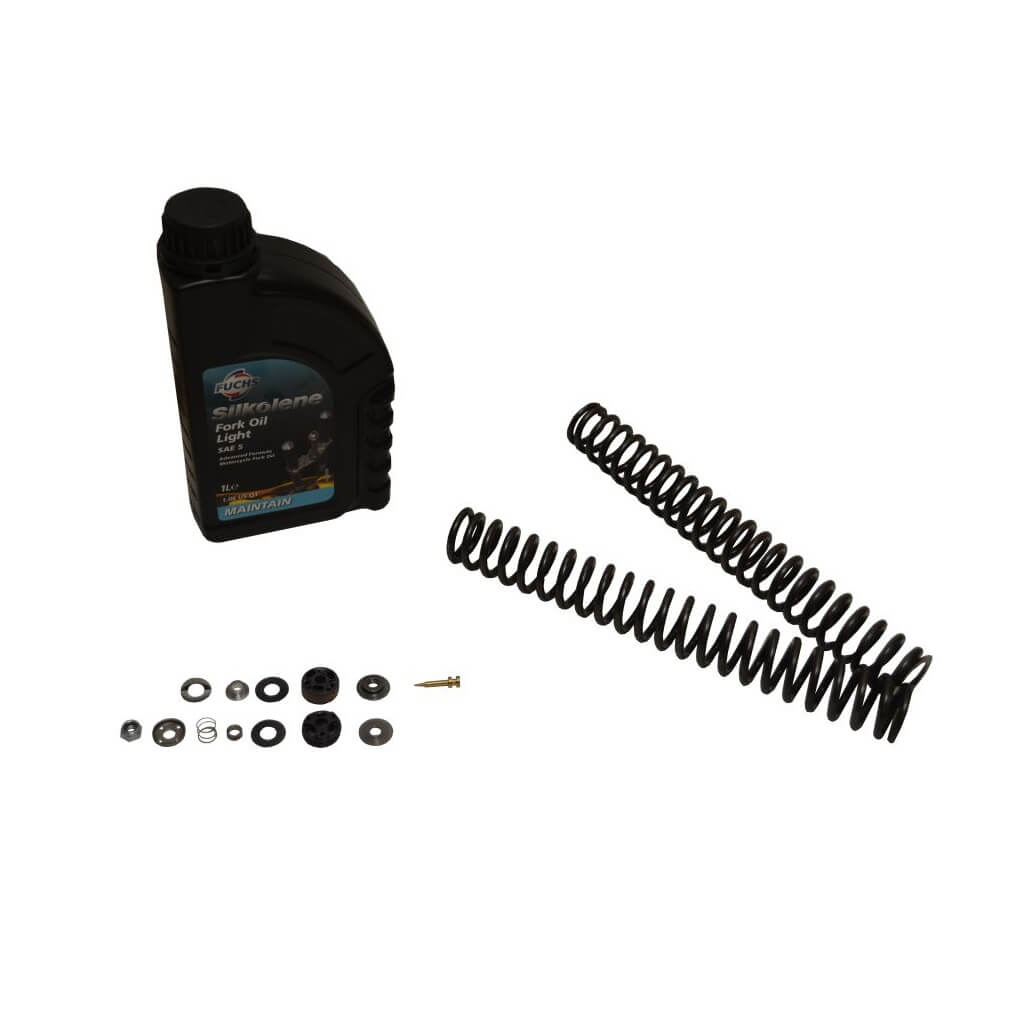
FZ-09 Fork Piston KitStoltec Moto is excited to offer a one-stop shopping approach for your FZ-09.  We put together a GP Suspension piston kit (rebound piston w/ shims, compression valve w/ shims, and rebound needle), drop-in Sonic Springs, and fork oil to provide customers with all they need to give the FZ-09 the forks it deserved from the factory.

Customers have several options on how the service is performed; see here for additional product details.  Forks are typically turned around within 1 week (exclusive of shipping).

Posted on Leave a comment

FZ-09 ECU Flash Update and Ride Report – New Year’s Edition

Yesterday, I promised myself I wouldn’t spend any timing working. But good intentions pave the way…to the racetrack? Seeing the looming forecast I decided to take advantage of the balmy 27F weather and work on the ECU map’s revision B. I spent a considerable amount of time smoothing out A’s quick turn throttle map and some minor timing smoothing in the upper rev range and am pretty damn happy with the results. Buttery smooth in all maps, but A is definitely the ‘hooligan’ map. It doesn’t take much to loft the front wheel in gears 1-3. I’m not a wheelie guy, but I honestly think it might be possible in 4th on this map. I’ll let some of you guys figure this out.

Throttle snatch, as expected, is directly related to the throttle maps (or fueling, if you like that approach – more than one way to skin this cat). B mode snatch is completely nonexistent. STD and A mode snatch is far less than half of the stock setup. After a few hours of tweaking the tables and several hundred miles on the bike, I’m completely satisfied with these maps. There will always be room for improvement, but I honestly don’t think rideability can be further improved on the stock exhaust/intake. I expect you can find a couple hp with some tuning, but I’m not expecting better rideability at this time (though would love to be proven wrong ). This bike has some of the smoothest fueling that I’ve ever experienced. Personally, I’d be good with riding this as-is, for a very long time. Yesterday was a good day to ring in the new year and the bike’s 1,001th mile!

Posted on 4 Comments

FZ-09 ECU Tuning – Final Tweaking | Stoltec Moto

God smiled down on us today and gave us a sunny 45 degree day. It’s not often we get to ride without heated gear at this time of year, so off I went. I spent some time on a variety of roads today to better sort out the suspension. I’m happy to report that all but the most awful roads feel wonderful. And when I mean awful, I mean roads that require supermoto-like suspension travel/compliance. The forks come damn close to performing better than my fully adjustable Tiger 1050 forks. Suffice it to say that warmer weather and clearer roads are going to be a problem for tire life.;)

But the REAL reason I had the bike out was ECU tuning. As most of you remember from about a month and a half ago:

I know you guys have been drooling for some ECU updates and I’ve been dragging my feet. Well, finally sat down and decomposed my notes into something useful (I hope).

Ignition Timing

From the factory, there are two ignition maps per drive mode. One map covers gears 1-2 and another covers gears 3-6. Although there are different maps for each drive mode, the ignition values are presently the same between across the drive modes. In other words, ignition timing is constant from mode to mode; it only varies by gear.

In gears 1-2 the factory map pulls timing between 1-2 degrees in a few places. Generally though, the bulk of timing retard is <15% throttle. Yamaha focused the timing retard in the 800-1400 RPM range and 3000-5500 range. There are a few other sporadic areas, but these are the concentrations. Yamaha employs similar tactics on many of their bikes, so this isn’t surprising. Given the affected regions, it appears they were trying to soften the initial throttle tip-in (despite what many riders have commented on).

For the purpose of this first exercise, the timing in the higher gears was used for gears 1 and 2 in an effort to increase throttle response in A mode only (STD and B timing modes were unaltered). The only exception were a few areas at about third throttle in the higher rev range that were smoothed out. The factory maps had some spiky inconsistencies (current thought is possibly for emissions).

Fueling

Typical FI layout on the fueling – fueling varies by cylinder and separate maps for TPS vs RPM, MAP vs RPM, Delta TPS vs RPM (by gear). Fueling maps are not customizable per ride mode. No changes were made to fueling at this time since we’re still running the stock exhaust and the A/F on the dyno was pretty flat. There are no obvious lean spots on this particular bike, so no effort was focused on fueling, yet. For those doing custom mapping on engine/exhaust work, this is the real deal. You’ll have full adjustment in more ways than you can shake a stick at.

Throttle Maps

It’s a pretty simple concept, but this is an area that I really enjoy. YCCT requires a throttle map to effectively communicate your wrist’s actions to the throttle butterflies. Yamaha has separate throttle maps for each ride mode, but they also have separate maps by gear. This is, in effect, how the bike’s speed limiter works. In fifth gear (STD and A), the ECU won’t allow full throttle over 10k RPM; in sixth gear, it’s 8500 RPM. These restrictions have been removed, so if you have the balls and real estate, you can try and best 132 mph. B mode does something similar, but it never allows full throttle. Full wrist rotation delivers 70% throttle. Naturally, less throttle = less power (10 hp per dyno)

As we’ve all surmised by riding these bikes, STD mode is essentially a linear throttle (50% throttle turn opens butterflies 50% – though still ramps up progressively), B mode is a slow turn throttle (50% turn opens butterflies 1/3), and A is a quick turn throttle (50% turn opens 61%). A delivers nearly full throttle at around 85% throttle.

The throttle maps for STD and B were left alone, but A was converted to a purely linear map (1:1). This has an interesting effect in the sense that the factory map (all modes) has a slower take up at small throttle openings and then ramps up very suddenly to the quick turn throttle. Basically, you get a little less opening than you command, but as speed builds, that relationship inverts and you quickly get more than you bargain for. So the new map comes on a little stronger under ¼ throttle and then goes completely linear through WOT. If you found A mode a little jumpy, this is a major contributer.

Other cool modifications

Eliminate fuel cut on decal (reduces engine braking) and default to a specified ride mode (as opposed to STD).

“Yeah, yeah, yeah, you’ve been yammering along long enough…how does the bike FEEL?”

In short – SWEET! I’ve been riding around on the new map for about a week trying to document the changes and summarize my thoughts. But immediately after pulling out, the reduced engine braking was instantly recognizable (and appreciated). This feature certainly won’t replace a slipper clutch, but it does a decent job of emulating it. Case in point, I’ve ‘accidentally’ downshifted effortlessly into first gear. The smooth transmission certainly helps, but quickly blipped downshifts are second nature. The difference is night and day. This certainly helps smooth out the on-off-on throttle transitions through the twisties.

The combination of eliminating the timing retard and advancing the throttle in the <25% range (literally, just a couple percent, nothing huge) really livens up the bottom end. This bike is a MONSTER (not like it wasn’t before). If you’re into wheelies, be prepared. But most importantly, smoothing out the timing inconsistencies and linearizing the throttle really make this engine smooth and easy to modulate. “Buttery smooth”, “Electric”, “Telepathic”…pick your cliché. This engine really allows you to outride the stock suspension…

So looking forward, there are a couple areas I’d like to refine before taking this mainstream. First, I’d like to soften the initial throttle response (in A). Contemplating pulling timing in low throttle (<6%) and/or reverting to the old <25% throttle map (leaving the new linear map >25%). This should please just about anyone who didn’t like the ‘urgent’ power delivery in A mode.

The pins are still the pacing item in getting this project moving along. Because the ECU is completely new, the required pins aren’t readily available, yet. So, although I’d love to be able to tweak some things on the fly, that just isn’t in the cards at this time. I’m planning to send the ECU back in a week or so once I make some more progress on the shock development.

All in all, I’m very excited by the results and am looking forward to tinkering. I’m envisioning a true quick turn map (ditch B – who needs it?), a good all-around A map, and maybe something silly like a launch control map. Who knows?

Closing comments: the smoother power delivery and better control really meld nicely with the fork upgrades and the new rear shock. The bike is more composed in every single way. No more bucking and seesawing as you whack the throttle, bury it into a turn, and rinse/repeat. As fun as that was, this is better. Much better. As usual, stay tuned for developments.

It might not be pretty (or fast), but at least it flashes:

The base flash that Chris at Flash-Tune did was already a monster (almost too much), so my goals with this latest reflash were simple:

1. Soften the initial tip-in in both A and STD maps.
2. Smooth out timing map in STD map.
3. Remove speed limiter in STD map.
4. Turn A mode into a true quick turn throttle map.

B mode was left completely in-tact. The factory’s initial tip-in was already very progressive and unintimidating, so there was no need to soften it further. Plus, the ~10 hp reduction is likely welcome by someone under the right conditions.

So onto STD mode. The sub-25% throttle map was softened to be more progressive in an attempt to reduce the open-closed-open snatch. 25%+ throttle opening was linearized to provide a more predictable response. Also, full throttle is now possible under 3500 RPM. The 2 degree timing retard was left for first gear, but altered to 1 degree for gears 2 through 6. A few areas of the timing map were smoothed out.

A mode was softened up a bit below 10% throttle (from Flash Tune baseline). It’s closer to what the factory’s STD mode was than a full linear map as we previously had. Above 10% throttle transitions to a linear throttle through approximately 25%. Above 25% ramps linearly into a quick turn throttle that peaks with 100% throttle at 80% throttle tube rotation (so 20% quicker than stock). The factory A map was less ‘quick’, but more progressive. Translation? Harder to modulate than this linear relationship. 1 degree of timing retard was added back into first gear to tame the off-idle response. Gears 2+ remove the timing retard.

The riding impressions were immediately apparent. ‘B’eginner mode feels the same, because it is. Switching to STD mode on the fly was a real kick in the ass compared to B. The softer throttle tip-in allows for smoother throttle applications and the linear throttle relationship at larger throttle settings is very natural. Want more juice? Keep twisting at the same rate (no surprises). Want less? Roll off, and you’re greeted with smooth deceleration. I guess the only way to sum STD up is ‘like stock, but smoother’.

Switching to ‘A’dvanced mode is an equally big kick in the ass (compared to STD). While I never personally felt the bike was overly snatchy, this new map is definitely a bit more user-friendly. Until you ask for more than ~1/4 throttle. At that point, hold on..the front end lifts with ease in third gear. I fell in love with A mode when I first picked the bike up, but the progressive quick turn throttle was definitely a bit like chasing your tail. A 10% greater twist may deliver 12% more throttle at some engine speeds…or more/less at other speeds. It was a blast, but there is always room for improvement. Personally, linearizing the quick turn throttle, is an improvement. Not only is WOT achieved earlier than before, but the throttle twist to rear wheel twist ratio is very natural and predictable. Calling the acceleration urgent is an understatement, but it’s never surprising.

I ended up switching between A and STD a lot. While many will fall in love with A’s hooligan nature (guilty as charged!), STD mode is so smooth and predictable, it’s sublime. I can make a case for leaving the bike in A mode during 90% of riding…until you hit some seriously tight mountain/canyon/track riding where the extra resolution of STD is beneficial to fine-tune your line. Pretty neat stuff. So neat, the last tank barely crested 90 miles till running on fumes, lol. Love it.

Being the particular SOB I am, I’m planning to tweak the 10%-25% throttle region of A some more. As good as it is, I’d like to start ramping into the quick turn portion of the map sooner. This should provide better granularity with a shallower slope. Stay tuned!

Posted on Leave a comment

US20 Kriega Luggage on the FZ-09

Added some luggage capability to the bike. The criteria were: lightweight, easily installed/uninstalled, waterproof, and invisible once removed. I love the hard luggage on the Tiger 1050, but it’s heavy and the racks are always visible when the bags are off the bike. Convenient for longer trips and great for commuting, but doesn’t really suit this bike’s personality. I’ve also used Ventura’s stuff on my Buells and Speed Triple. LOVED their setups….except for the attachments. Although it was light, it still added weight. And looks? Well, at least you can’t see it when you’re riding…

Enter the US-20 Kriega. 20 liter capacity and built like a waterproof stuff sack, this is impressive. The waterproof liner is removable, and there are a multitude of attachment options. Best of all, when the bag isn’t needed, remove the seat, tuck in the strapping/loops, and reinstall the seat. No sign of luggage…at all.

The pictures show the bag on the bike with a 15.6″ laptop and about 3 days worth of clothes (I’d estimate about 2/3 full). Perfect for commuting and short weekend trips. The front of the bag slightly touches my back side when installed, but I personally still have enough room to sit and move around comfortably. YMMV, but the bag can be positioned a bit further rearward (or perhaps oriented across the seat if you’d like).

Posted on Leave a comment

Yamaha FZ-09 Fork Piston Kit Breakdown

Following up to Tuesday’s fork post…with pictures and some explanations.

As I mentioned, the GP Suspension kit includes the following components:

  • 20 mm rebound piston w/ custom shim stack
  • 20 mm compression valve w/ custom shim stack
  • Rebound needle

Stock needle on the left, GP’s shiny new brass 7.5 degree needle on the right. The larger taper angle allows for more adjustment and better flow characteristics through the rebound bleed circuit.

Here is where the real magic happens in the rebound circuit. The stock piston is on the left, the GP 20 mm piston is on the right. The larger oblong holes you see are the ports used for reverse flow – oil flows through during the compression stroke so that the piston assembly minimally adds compression damping. The 3 large(r) holes in the recessed/dished areas on the stock piston are the high speed rebound feed ports (these are what load the shim stack). As you can see, the GP piston uses double the hole count on a larger hole circle to both flow more oil and obtain more leverage on the shim stack. The ports are nicely machined to improve flow through the port. Now, you’re probably wondering why we’d want to flow more oil through the FZ-09’s rebound circuit. Short answer is, we don’t. The stock setup doesn’t have enough rebound, so we’d actually want to reduce oil flow; the heavier oil used previously with the heavier spring rates was done in the same light. GP, like Penske, RaceTech, Traxxion, K-Tech, etc. make various pistons that are used across multiple bikes. This port design was done to optimize the geometry across a wide variety of applications. So how do we add damping back? Good question…

The stock rebound piston and shim stack is on the left. GP’s setup is on the right. Though the pictures aren’t great, you can see the heavier shim stack. Varying the shim diameter, thickness, and order in the stack controls the mid-high speed damping response. The combined effect of the needle, piston, and new shim stack is a wider adjustment (ranges from less than stock to MUCH more). No more pogo-ing down the road.

Here’s another view of the shim stack, this time assembled. From the left to right, top out spring (takes up unsprung mass when the wheel is in the air), rebound piston holder (needle assembly inside), new check valve (provides ‘unrestricted’ flow during the compression stroke), GP piston, and custom shim stack…all tucked under the factory nut.

These are the compression valves. Similar deal as the rebound piston, but a little different. The larger oblong holes provide the same increased functionality over the stockers. The high speed ports are actually a bit smaller to work in conjunction with the high speed shim stack. Not shown here, but a bleed port has been added to the piston to provide good low speed compression response in light of not having a dedicated/adjustable bleed circuit.

This is the final assembled compression base valve. You can see the shim stack here.

While inside the forks, I did a light polish on the damping rod to reduce sliding friction. I also chamfered the cartridge tube ports to flow a little smoother.

Before:

After:

Some FZ-09 trivia, unlike most modern forks, these cartridge tubes are steel, not aluminum.

It’s a good thing I had the bike out when I did. Got a few inches of snow shortly after the ride and the roads are back to shit. Yay…

Posted on 1 Comment

Christmas Eve Suspension Tuning

It’s been another couple crazy weeks. Been super swamped with customer orders/projects (thanks, guys!), holiday BS, family-related ‘things’, and of course, general FZ-09 development.

As I mentioned in an earlier post, Barry at GP Suspension sent his fork piston kit. A set of Super Tenere forks just arrived and two more are in transit, so I took the time to get the kit in the FZ-09. Barry worked up a couple nice shim stacks and figured out a good compression bleed size. He also threw in one of their 7.5 degree rebound needles. So all in all, this kit is comprised of GP’s pistons/shims, GP’s needle, some 0.90 kg/mm Sonic Springs, and Silkolene 5wt. Some minor massaging on my part included chamfering the cartridge tube ports and polishing the damping rod.

Yes, I know…where are the pictures??? All in due time! The weather has been craptastic around here recently with over 15″ of snow falling through the past two weeks. So, the roads were covered in salt, cinders, and sand. Fortunately, mother nature sent us a few inches of warm rain the past couple days and all the snow melted. Roads are still spotty, but I made some time to do a test ride earlier today. All I say is ‘wow’. I alluded to this in a previous post, but upgrading a new bike never gets old. Although good results are expected, it’s such a treat taking a ‘good’ bike and making it ‘great’. I’m happy to say we’re there!

Rebound feels great with a proper shim stack (even on the 5wt). Compression is very comfortable over rough roads and transmits just the right level of feel for the street. Brake dive is about the same as the previous setup (springs with 10wt oil), but the high speed compression harshness has been eliminated. Despite the fact we still can’t adjust the compression on this setup, it won’t really matter for the majority of riders. Yes, I have a set of 25 mm cartridges that will go in here, so this bike will be adjustable. But, if cash were an issue, this set up is amazingly good. In the back of my mind, I was expecting to fiddle with the shim stacks a little bit. Maybe add/remove or rearrange a few shims. I should have known better, because Barry took care of it. Take 1 FZ-09, add this fork piston kit, and swap on an 8983…you can keep your Street Triple R any day of the week.

I know a lot of guys are reading this thread who are on the fence about buying an FZ-09, primarily due to the suspension. Don’t fret – take the plunge. As it sits today, the bike is ready for anything you want to throw at it, short of racing. By now you’ve probably figured out that I don’t like to oversell something, so I’ll leave it at that. This kit will be available shortly, with a couple options on shipping/labor – keep an eye on this thread on our sub-forum.

I’ll post some pictures later in the week, but until then…Merry Christmas – Feliz Navidad – Frohe Weihnachten, etc.!!

Posted on Leave a comment

Progress: Woodcraft, Flash Tune, and GP Suspension

I’ve been busier on this end than I anticipated, so I’ll do my best to catch up today with some updates.

First order – frame sliders. Have a new slider base for the RH side about 15 mm shorter to even out the sides. Looks much better, has a shorter moment arm to increase the strength of the part, and very closely mimics the clearance to the LH side.

Both Eric and I agree that these are done and ready to move forward. Woodcraft is going to do the extra work to anodize the bases black with enough interest from you guys (typically always silver). They won’t be a cost increase, but we’ll need to get enough interest to justify the time and expense on their end. I’ll get a thread started soon (hopefully today) regarding the pricing, availability, etc. Stay tuned.

On the ECU side of things, the bench flashing setup is finally operational. The ECU needs to come out for the bench flashing, so this is a project for later in the week. God willing, the roads will clear enough to get some test rides in with the revised throttle map. Naturally, my fingers are crossed!

Moving to the suspension, got a call yesterday out of the blue from Barry at GP Suspension in WA. They have developed a standard revalve kit and are working on a drop-in 25 mm replacement cartridge kit. Both kits aim to fill a void I was planning to address, which is good. The engineer in me wanted to get into the design myself, but this could be a blessing in disguise (more time to allocate to other products). So…stay tuned on this front. Stoltec Moto is already a GP Suspension dealer, so we’re going to work out the details on both offerings ASAP. Bottom line for now…stay tuned. Got a few irons in the oven.